Yes. Now that I’m not binding it, I can talk about it. (Will be a series of two posts today.)
I bound a book a couple of years ago and have been doing mad research since then to improve my technique and authenticity. The last one, as you might remember, was a noble attempt.
This one blew it out of the water.
Firstly, I used way better paper. Last time was sketch paper, non-archival, sort of kind of cotton rag (but not totally). This time was a smooth 100% cotton rag, 32lb. It worked loads better. I also used letter sized paper, which meant I did less tearing. That was a good idea.
The book block in its initial stages of sewing:

(I am lazy and did no color-correcting. Sorry.)
You can see how nice and even these are. I used the regular link stitch I used on the last version. There’s another variation that appears that showed up on an example in Islamic Bookbinding, an Oriental Institute publication, which has an extra twist in each stitch. I’ll experiment with it, but it looks trickier than the one I use. Maybe it’s because most of those examples have only two sewing stations? I really need to be eliminating a sewing station for the sake of general authenticity, so I’ll give it a shot.
Anyway. Then the book after sewing:
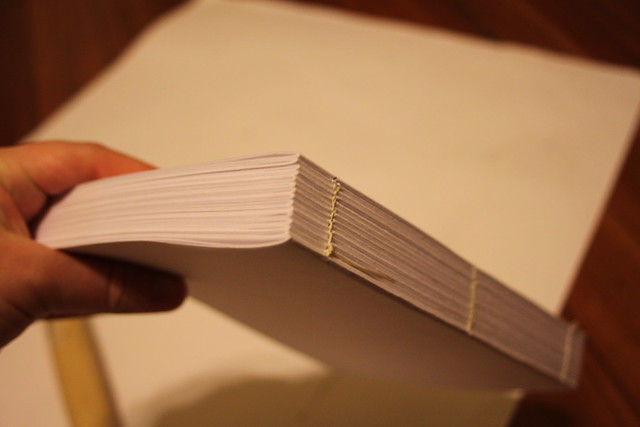
It’s all together, but not yet straightened, pounded and pressed. You can see the one errant quire at the top of the stack, sitting a little farther back into the block than the others. That little bugger was hard to fix. I did fix it. Actually, now that I look at it, the stitches look just like the ones in the extant example. I think I was looking at the center sewing station rather than the edges. I obviously need to eliminate that center station.
The correct one (closest to my hand) and the errant one:
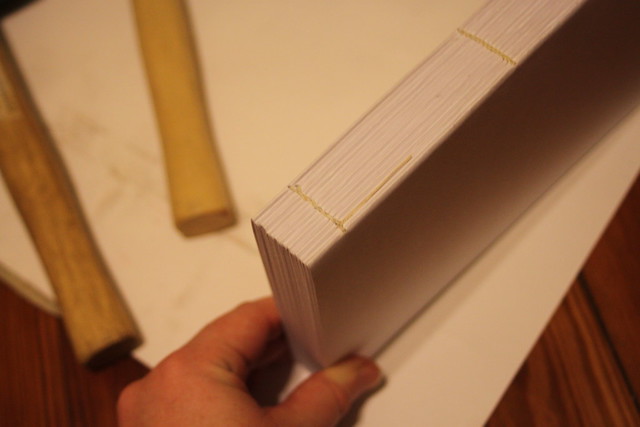
If you look closely, you can see the difference in the two stitches. One is more regular, like a chain, and the other looks more twisted, like a rope. That ropey one is the correct one.
Enough about stitches. I took the block, hammered the spine edge flat, and then clamped the book and its boards into a rope press. I need a new rope press (mine is sucky). However, through liberal application of knife, files and elbow grease, I got a really nice, square book block:

I am really proud of this. It’s not perfect, but it’s very close to being good. I have some ideas for next time (and some great tips from the judges at KA&S).
And then I glued paper hinges to the spine, as visible in this photo:

These were not actually correct, but I know what to do next time (they are way too wide).
After this should have been the application of the endpapers, but I didn’t realize that until much later. I suppose it’s good that I plan on making more of these, no?
Once the spine was dry, I used gum arabic to stick a little bit of leather to the head of the spine to serve as the core for the endbands. Gum arabic is funny for this application – you spread it on, let it dry, and then rewet it like you would a stamp. It sort of works. My leather was too thick anyhow; we’ll see how thinner leather fares. Then you sew waxed thread through the sewing holes at the head and tail of the spine to create the weft threads for the endbands:

These wefts are the original ones I sewed, before I realized there were too many. I pulled them out and reduced the number by half (which made a big difference). Really you only need one weft thread per quire.
I took blue and white silk thread and a curved needle and twisted them while sewing to generate the trademark chevron pattern used in Islamic books:

I have totally got the hang of this, which is AWESOME, because it drove me bonkers the last time I tried it. I’ve been practicing.
Then came time for the leather covers. I spend an embarrassingly long time trying to divine the geometry behind the design I was copying, but realized I need to learn a lot more about Islamic geometry before I do that. As it was, I tried for four hours and finally gave up and traced the design. From this:

(Yes, I taped the paper to the monitor and gingerly traced it. Yes, I realize that there is an easier way to do it, but didn’t want to spend the gas when I had this solution at hand.)
I had tried making my own pasteboard

but was not at all satisfied with it, so I used regular bookbinder’s board for the covers (I will keep working at pasteboard). I pasted one on the leather with wheat paste and then did a really good job of stretching the leather over the board:

It was really stretchy, which I later found out was because it was alum-tanned. This is important, because alum-tanned leather is hard to tool without using heat, as it is very elastic. I feel much better about my tooling skills, now that I know that. However, I didn’t do too badly, all things considered:

Then I cut the other remaining boards and laid everything on the leather for the rest of the tooling:

There is some disorder in the steps, but I’m working on figuring out how those go. I think I was supposed to tool before doing turn-ins, but I did it the other way, since I’m still learning.
Here’s the book plus turn-ins, with cover flap untooled:

So I finished all of that, and block stamped leather for the doublures (covering for the inside of the covers). Then I glued that in:

I was dinged on my crap trimming job, which I totally deserved. It was a crap trimming job.
And then I gilded the covers, using gold ink in place of shell gold, since I’d never used shell gold before and shell gold is kind of amazingly expensive. Another thing for next time.
Here’s one cover in progress:

Then a detail of it almost done:

And then totally done:

And the cover flap:

I realized after I came up with this design that the actual design appeared later in the book I was pulling extant examples from. And then the A&S judges pointed out that while lovely, my interpretation was inconsistent with other period examples. Oh, well. Lesson learned.
I also came up with a design for the fore-edge flap, and it’s pretty accurate, except that there is no Arabic text on it:

After that I pasted in endleaves, having not realized I could use them until too late, and guessed (incorrectly) at where the blue paint needed to go. It looked lovely, all things considered.
So that’s pretty much it. Later today I’ll post about Kingdom A&S, which is the continuation of the saga, and yielded many exciting new bits of information.


Sorry this is so far past this project, which is amazing by the way. I have just figured out how to do decahedrons, which this may be based from. Once I figure out how to describe the process, I’ll let you know if you want. Also, I found copies of the geometric design notes i did for the class. Do you want me to send you copies? It is mostly 6 and 8 point design, but you might enjoy working with it, if you want.
YES! I tried in vain to locate my copy but was unsuccessful. Although I’ve finished this book, it became clear to me that a very solid knowledge of Islamic geometry is essential to mastery of Islamic bindings, so any help I can get on that path is very welcome. Thanks!
This is so gorgeous! Congrats on your 19/20
Thanks! (And sorry for the very delayed reply; life is crazy around here.)
You’re a goober.
1) Book is HELLA AWESOME.
2) You should have called me … I have a button of shell gold that you could have used. Next time, hit me up.
Yay! I’m glad you like it!
I definitely will! Thanks for letting me know.
This time I didn’t use it because I had never before used it ever, and didn’t want to learn on such a huge project. Next time I will be using the correct stuff.
It looks amazing!
Thanks! You, too, can bind books like this! It’s so much fun.